Into the Wild + Quinoa Johnny Cakes

IMG_5213 We returned yesterday from a sweet weekend getaway to the mountain town of Julian, CA. Lucky to have acres to roam and a Quonset hut to nest, these family escapes are more rare now as we are scheduled to the stars with sports and other commitments. The property is not ours per se, but belongs to my family, and we have been adventuring there for nearly 10 years now.

I'll be honest. We're not exactly roughing it. I packed our SUV to the gills with the following... paint, glue, yarn, scissors, markers, paper, leather Motorola radios ("walkie talkies") pink ski vest + Uggs books + magazines my camera big straw hat scooters + helmuts cooler, dry goods, sparkling water, spices Bose sound dock a bottle of pinot plastic eggs + chocolate + goofy glasses

As I closed the back of the truck, I thought it might be possible that I've simply outgrown camping.

IMG_5286

I let go of email and running, and turned instead to hiking, cooking, reading, gathering, making. We crafted swords and slingshots, I collected feathers and daffodils. We ate True Food Kitchen's quinoa Johnny Cakes and I baked Spanish chicken with onion, potatoes and spicy sausage. We dyed eggs with beets, red onions and turmeric, and huddled together on a loveseat in front of the tiniest TV screen for a Friday night movie. I was up at daybreak each morning, and heard the call of the turkeys as I hid eggs on Easter Sunday. Later that day we packed up the truck and gave a heavy sigh, with the promise to return soon.
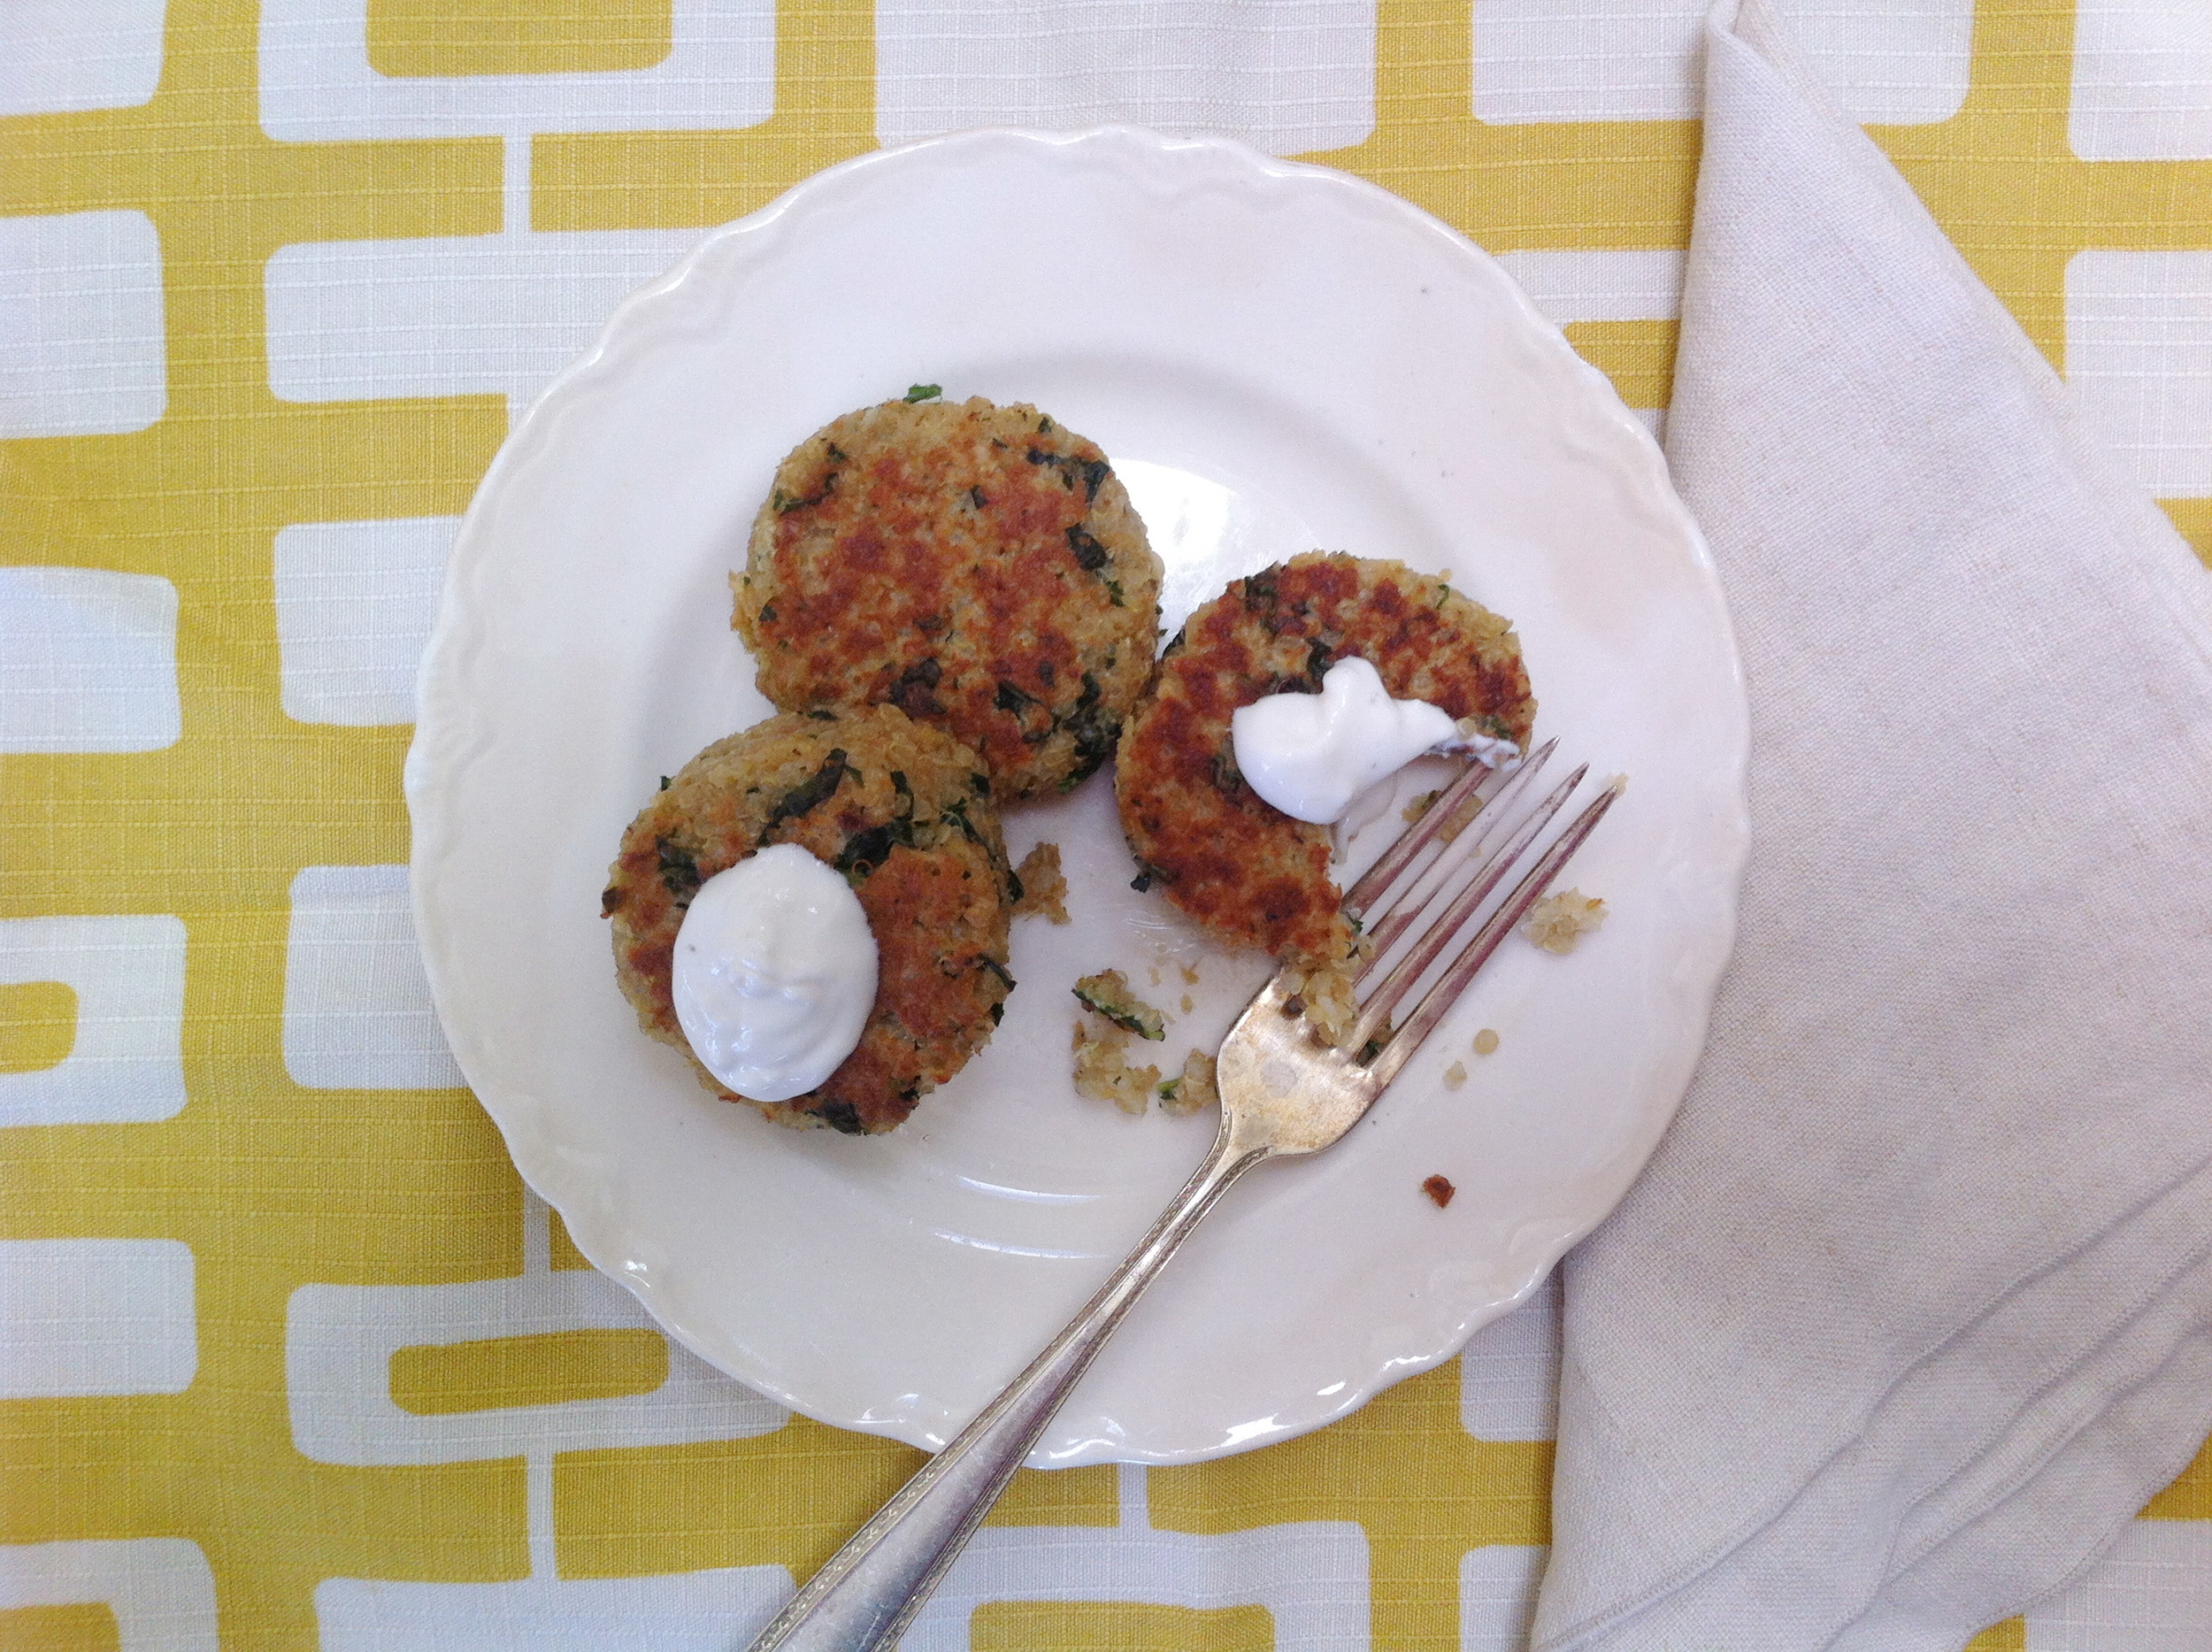
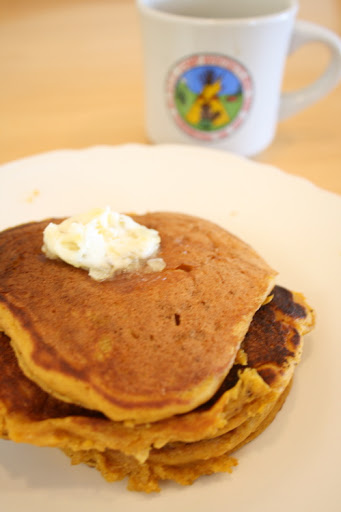
IMG_5221

Quinoa Johnny Cakes

My go-to dessert dish when I brunch at True Food Kitchen with my lady gals. Barely adapted from Dr. Andrew Weil's True Food Cookbook

Recipe:

2 cups cooked quinoa

2 cups whole wheat pasty flour

1/4 cup sugar (evaporated cane or white)

2 tbs plus 1 1/2 tsp baking powder

pinch of sea salt

1 tsp ground cinnamon

2 cups whole milk

4 large eggs

1 tsp vanilla extract

orange zest

1/2 tsp olive oil

pat of butter

Toppings:

ripe banana, apples, or blueberries

Greek yogurt (plain or vanilla)

maple syrup

Method:

1. Make quinoa. (HOT TIP: If like me, you normally add some savory "better than bouillon" flavor to your quinoa, skip it if you plan to use leftovers for these Johnny Cakes).

2. Combine the flour, sugar, baking powder, salt and cinnamon in a large bowl. Whisk well to combine. In another large bowl, combine the milk, eggs, vanilla, orange zest, and oil and whisk to combine. Add the dry ingredients to the wet and blend until just combined. Fold in the cooked quinoa taking care not to overmix. Let the batter rest for at least 1 hour.

3. Lightly brush the cooking surface of a nonstick pan or griddle with butter. Ladle about 1/3 cup of the batter onto the hot pan. Drop banana slices, thin apple slices, or 8 to 10 blueberries on top of each pancake. When bubbles form in the batter, flip and cook on the other side until

lightly browned. Continue with the remaining batter and choice of fruit.

Serve topped with a dollop of yogurt and maple syrup on the side.

IMG_1359

Blood Orange Beet Bowl

bloodoranges I got super lucky this week and landed a small stash of blood oranges from a neighbor. This happened to coincide with a craving for roasted beets, which I had already planned to make. Tired of my usual beet-goatcheese-pepita-oliveoil salad, I decided to merge these two heartbreakers into one bloody beet bowl. This is how it went down...

IN ADVANCE: I roasted the beets coated in a bit of olive oil and salt in a 350 oven for nearly an hour. This is sketchy, because I was cooking other things at the same time, on and off. It's an art. Not a science. Once out and cooled I slipped their dirty skins off. That sounds mildly sexual. Oh well. Then I cut them into 1" chunks a tossed them into a jar in the fridge for later.

NEXT: I prepped two small blood oranges by cutting the peel off with a serrated knife. I usually take the tiny pith core out too. I cut these into bite sized chunks.

beetorangebowl

AND THEN: I combined the orange pieces with 3/4 to 1 cup of the beets in a bowl, and grated (~ 2 teaspoons to 1 Tablespoon of) fresh ginger root right on top. Then a drizzle of honey, and a sprinkle of salt to bring out the full flavors.

Done! I think you could still safely add goat cheese, if you so desire. Or perhaps go super savory and do garlic instead of honey, and toss in some finely sliced red onion or shallots...

BEETPLATE

Beets produce the most perfect shade of magenta ever.

PS >>>>>>---------> Forgive my iPhonography, I was documenting on the fly!

Menu Planning in 4 Easy Steps

menuplan-1 One thing I love about Saturdays is Menu Planning. It's a household chore, sure. But I get to sit down and pour over cookbooks, cruise my favorite cooking sites, sip a strong cuppa java, and plan out the next week of meals. Running an efficient household while raising two boys, staying (happily) married and working full-time is no small task. This single strategic step makes everything flow just a little bit easier...here's how:

menuplan-2

1. SUPPLIES

Get organized. One side of our fridge is still magnet friendly, so that's our information hub. Create a spot like this in your kitchen's high traffic zone. Make it PUBLIC so your family (ahem, in my case, the Mister) can add to the shopping list, as well as read up on the week's menu. This avoids the whole "well I already had fish tacos for lunch" issue.

Basics: Paper, Pencil, magnet or tape Advanced: MENU worksheet with grocery list, pencil, magnetic list pad, clipboard, highlighters, Spot-On! Magnetic Hook

2. PREP WORK

A. Maintain a Shopping List. Track your household needs on an as-you-go basis. Out of oats? Write it down. Low on canola oil? Jot that note as SOON as you realize it. It's a total pain in the boot to take pantry inventory or waste time conjuring up the "oh-yeah-I-used-up-the-last-of-the-fill-in-the-blank"  from the past week.

B. Keep a Family Calendar. In this stage of planning I review the coming week...Are we home every night? Anyone out-of-town? Does the Mister have plans? Do I have a work event? Who has what sports and how late? I want to make sure I don't plan to roast a chicken on a night when I'm working late, or have soccer pick up. I need this plan to WORK for me. Not be a source of frustration. If there is a night I have to work late, I map out something the Mister can easily execute, like Corn Dogs + applesauce + steamed broccoli. (My healthy fast version of Corn Dogs =  hot dogs wrapped in corn tortillas).

3. INSPIRATION

Before you get too excited, consider the following:

1. How much time will I need/have? By reviewing your calendar in advance you should be able to set realistic expectations. Clue #1? Save the intermediate level recipes or the "baste-every-hour" roasts for a weekend day. Duh! 2. What new ingredients will this require? Are you willing to source out the ingredients required in that new Indian dish? If so, awesome! Make it an adventure. If not, don't commit to it, and therefore set yourself up for failure or disappointment. 3. Are there any special requests from the family? Make sure to give your kids/hubs a voice, if they would like to contribute.

There are PLENTY of recipe resources out there, but I recommend selecting a few "go-to's" each week (fave cookbooks, mags or websites), and one or two newbies so that you don't get stuck in the inspiration stage. Remember, you still have to implement. Your goal at this point is to have an idea of the kind of

Ask  friends for their  favorites, look at family recipes, mull over magazines. I love looking through cookbooks. Now that I plan my menus, it's much easier to justify the expense of glossy new food porn. Gorge. I always throw a few tried-and-trues into the line up, as I'm not trying to run a test kitchen. That said, I like to pick (at least) one new recipe each week, depending on the busy factor.

My Current Go-To's: Supernatural Everyday (101 Cookbooks Blog) Dinner: A Love Story (Blog) Bon Appetit has a great website. So does Food & Wine and America's Test Kitchen (Heads up: some content is only for paid subscribers). I'm also liking Vegetarian Times, Whole Living...oh! and Cooking Light has made such nice design leaps since I was a newlywed subscriber, that I recommend picking up a hard copy every now and then. Finally, check out Mark Bittman's site, and fittingly, the New York Times Dining & Wine section.

Weekly Menu

4. IMPLEMENTATION

Yay! It's time to map it all out. I made myself a Menu Plan Worksheet that divides the paper into two major sections...Left side, MENU items, Right side, GROCERY LIST. Do it however works best for you. Or download mine here: Weekly Menu.

A. Before you start filling it in, there are some key considerations: Is it well Balanced? Omnivores at heart, we are focused on creating more meatless meals. Got Fish? Let's hear it for lean protein and omega 3s! Special Events? Am I on the hook to bring a dessert to Bunco? School Snacks? Are we low on granola bars?

B. MAKE YOUR PLAN I usually write in the main dish and the side(s) so I don't have to think about it. Write down any special ingredients you'll need onto the grocery list section.

C. Transfer any current "to buy" items from your ongoing fridge list to the grocery list (menu planner sheet).

D. Go shopping and make great food!

CONGRATULATIONS! You've just made the coming week SO MUCH easier. And true confessions...this stuff changes, you know? So if you get invited over to your neighbor's house for brats, you go with it. And ax the plan for that night, or sub it for another night. It's way easier to have too much scheduled than nothing at all.

Mahalo!

Mahalo Mondays: Kauai

I missed the boat on the whole daily gratitude phenomenon that often happens in the month of November. It's a great idea, sure. But I'm not that disciplined. That's why I'm launching Mahalo Mondays-- a weekly post to chronicle my thankfulness. Mahalo means more than just 'thank you'. At its core Mahalo is a divine blessing of gratitude and thanksgiving. When used, it calls for authenticity and thoughtfulness. I'm grateful to have experienced Mahalo, thanks to a family member who provides us a place to stay on the island of Kauai.

This tropical isle has given us sunwashed salty memories--fresh fish, warm sand, easyrelaxation. After our first trip we adopted a simple "Mahalo" as our family dinner blessing. It's heartfelt simplicity suits us, and even if we've hollered our way to the table, serves as a gentle reminder of our best times together.

This Thanksgiving we'll add our island toast to the family blessing, and maybe sneak in Somewhere Over the Rainbow, by IZ.

Meatless Monday: Gary's T-Night Tacos

We did it again! Continuing on the New Year track we vowed to stay meatless on Mondays--even the Mister, who planned his lunch around Fresh-n-Easy offerings, and snuck in a chicken thigh at 11-something last night.

Tonight's recipe was awesome, and direct from Laurie David's Family Dinner cookbook. We are a taco-lovin, bean eating bunch so Gary's T-Night Tacos seemed a perfect match. Using two onions (Shhh!), black beans and the secret ingredients of maple syrup and tamari, this hearty filling made fantastic tacos (and burritos for the boys).

For toppings we used thinly sliced cabbage, fresh avocado, chopped tomato and cucumber, Greek yogurt and shredded cheese. Instead of the dressing suggested for cucumber salsa, I used a lime cilantro dressing I had already made for another recipe. The boys ate theirs without the dressing, but with most of the other toppings.

Max ate about 2/3 of his, Beck finished his off, and, well, the pan is now empty. I consider it a success!

Oh, and after dinner we got all cuddly and weepy watching this awesome cover (from some locals) of Edward Sharpe and the Magnetic Zeros "Home". Then, this great studio clip of the real deal...

Meatless Monday: Lettuce Wraps

I usually greet January with a long list of goals and measurable objectives--the same type of parameters that I resent being judged by in my 9-5. This year I've put nothing in writing...yet. That said, when creating this week's menu plan and grocery list, I decided to make my first 2011 resolution: Meatless Monday. Last fall I had the desire to cultivate our family dinner time, and perfectly coinciding with this was the release of The Family Dinner, by Laurie David and Time for Dinner, by former Cookie editors, Pilar Guzman, Jenny Rosenstrach and Alanna Stang. I've been exploring these two new fabulous cookbooks, and as a result I have embraced a new level of domestic enthusiasm and organization. While I can save my book reviews and lady adoration for another day, I will share that it was Laurie David's book that made me aware of the Meatless Monday movement. Seriously, it sounded familiar but I just wasn't tuned in.

Meatless Monday actually started in World War I and was incredibly effective at changing the nation's eating habits. Somewhere between June Cleaver and the Great Bacon Explosion we seem to have lost our way. While I'm a proud omnivore and my boys drool at the word STEAK, we love all kinds of food and don't feel it's necessary to include a meat/fish/poultry product at every meal. The Mister is on board with my meatlessness and the boys are pretty good sports too. Any random night we might have tofu stir fry or a veggie spaghetti. So why make a big deal about it? Well, I like the idea of a habit, a ritual, a conscious decision.  I like the challenge of trying new recipes, and the boys are at a great age to explore new foods and ideas.

For our first official Meatless Monday we used the recipe for Vegetarian Asian-Style Lettuce Wraps (without the dipping sauce) courtesy of Leslie's Home Gourmet. I doubled it and adapted it a bit, so maybe follow her link for the real deal! The leftovers are perfect with chopped Romaine for a salad, or over rice warmed up. We served it with steamed broccoli and couscous just in case it didn't go over as well as hoped. For the record, the Mister gave it a thumbs up, Max ate nearly both of his wraps before deciding he didn't like them, and Beck ate everything on his plate, plus applesauce, and a second meal of pears, rice crackers and dried apricots. Hungry much?

Lettuce Wraps

2 packages firm tofu crumbled 1/2 medium onion, diced 1 cup shredded cabbage 2 carrots, grated 2/3 cup (plus a little more to taste) of your favorite soy marinade (Soy Vay Veri Veri Teriyaki) 1 tsp. fresh lemongrass, minced (Thanks KKJ!) 3 cloves garlic, chopped 2 tbs. sweet chili garlic sauce Sprinkle of salt to taste 4 tbs. canola oil 2 tsp. sesame oil 1 medium head of Boston/Butter lettuce, washed and leaves separated

In a skillet, heat canola oil over medium heat and saute onion and garlic until it begins to soften. Season with a touch of salt. Add cabbage and carrot. Saute for 2-3 minutes. Add tofu and lemongrass, marinade, sesame oil, and chili sauce. Cook another 5-10 minutes (until it thickens a bit), stirring often. Serve warm inside cool lettuce leaves.

Good Morning Granola

When trying to come up with this year's (okay, now last year's)  handmade holiday gift the boys expressed a VERY strong preference for cooking, versus crafting. Cool. In order to guarantee the "handmade"part of the deal, I came up with granola. Easy enough for kids to measure, stir, and add their own creative ingredients (and mine). Two factors came in to play on this recipe...ONE, I wanted a granola that I could eat without feeling guilty. TWO, it absolutely had to be inspired by the granola at my favorite bakery--Bread & Cie.

Martha Stewart FOOD helped with requirement number ONE. As for inspiration from Bread & Cie.? That's where the Corn Pops came in. It's not even that I had this cereal as a kid (I didn't) or that I crave it as an adult (I don't). It's just that Corn Pops bring a bit of whimsy and surprise to an otherwise quiet concoction.

GOOD MORNING GRANOLA makes 8 delicious cups

ingredients 4 cups old fashioned rolled oats 1 cup toasted wheat gern 1/2 cup flax seed 2 teaspoons cinnamon 1 1/2 teaspoons ground ginger 1/2 cup unsalted sunflower seeds 1/2 cup pepita seeds 1 cup chopped walnuts 1 1/2 cups Corn Pops 1/2 cup dried berries 5 tablespoons robust molasses 3 tablespoons maple syrup 1/3 cup olive oil 1/3 cup water

directions 1. Heat oven to 300 degrees with rack in center. In a large mixing bowl, combine oats, wheat germ, flax seed, cinnamon, ginger, seeds, and walnuts. In a small bowl, combine molasses, oil, and 1/3 cup water and pour over the oat mixture. Stir well until well coated. Spread evenly in two baking pans

2. Bake, stirring every 20 minutes or so for even cooking until dry and lightly browned--about 45 minutes. Let granola cool to room temperature, add Corn Pops and berries then store in an airtight container at room temperature for up to 1 month.

The boys were liberal with the cinnamon, and added dried cranberries. I threw in the pepita seeds for extra nutrients and crunch. We used olive oil instead of the recommended canola oil, and we added maple syrup because we had just watched Elf, and Elf puts maple syrup on everything....

In the end, we thought it was a huge hit. I even used it as a topping with Greek yogurt and our Orange Challah French Toast!

The Moustache Bash

 
Signage & Decor
I tried to keep the costs in check, so I made all the signage from old cardboard and splurged on cool ribbon from Michaels. I painted moustaches and 'sevens' on some old canvas I had lying around, and popped them into quilter's hoops that we bought at the thrift stores.
Mad Props
Upon entering the party, each guest was treated to a "Stylish Mustache". I bought these through Amazon. Unfortunately, the sweaty youngsters wore out the adhesive, so we resorted to an impromptu moustache painting station. It actually worked out even better (Salvador Dali!), though the fuzzy ones did look pretty awesome for a bit (Tom Selleck at age 7! Doesn't get much better.). To create the Moustaches on Sticks we bought brown and black felt and dowels (Michaels) and cut out cool 'staches for props...displayed in a cylinder of black beans. I also made but forgot to photograph some chocolate moustaches with  candy molds I bought online. I'd say less than half survived my candy making (wrong type of chocolate? Uggh!) but those that did, went out the door as party favors. They were each on a lolli stick and wrapped in cellophane with black and white ribbon.
 
Next up, was the Photo Booth! Great for memory making, and fun to do. I took the boys thrift shopping a week or two before to pick out some special props to add to our own dress up stash. We found awesome finds in the early Halloween displays--top hats, bowlers, supersize sunglasses, vintage tennis racquets, and more. Super fun for all, and just wish I could have hung out here the whole time taking pics. I'm still in the process of printing some keepers, and sending out with thank you notes. Another easy activity was the Graffiti Wall--I had the boys help comb through magazines and find pictures of faces (big, full ad type) so that we could add our own moustaches, and whatever else...set out a Jar-o-Sharpies and they had a gas deconstructing the glossy images.
Games
I took images of the boys (used for the invitations) to Costco and blew them up for a little game of "Stick the Moustache on Max & Beck". My cousin Morgan cut out some pretty rad 'staches (note the fumanchu!) to use for this game.  Next we played "Hot Potato Sac" which is a game I found online. It's essentially a pillow case stuffed with dress up clothes, and while kids sit in a big circle, music plays, the sac is fired off from kid to kid. The music stops, and wherever it lands, the kid sticks a hand in and pulls out something to wear. At the end, the kids vote on the silliest dressed player. They had so much fun, they asked to play again. Easy answer? Just let them rock the dress up stuff the rest of the party. For a little more free play we left out a pile of pipe cleaners, a bowl of bubble solution, and some bold chalk for the patio. This was a nice option for some of the younger party peeps. And the girls.
The Party Favor bags featured our moustache potato prints. Each guest got the boys' favorite Reeses Peanut Butter Cups, some type of quirky alien or monster or reptile item (boys), or bubbles or a notebook (girls).

Unfortunately I was so rushed for the party beginning, that this is the only shot I have of the giant chocolate chip cookie. The kids devoured the single cookies from moment one, and frankly there were just crumbs remaining of the giant confection after the last of our neighbors headed out later that night. The most awesome recipe for this? The one with loads of real butter that I followed by heart and did not substitute wheat flour or applesauce, or add flax or yogurt to? A New York Times feature recipe adapted from Jacques Torres. Secret to this? Make the dough. Refrigerate. Let the ingredients soak each other up. Holy Cuss. Delicious. Crazy good. Happy Birthday Boys!

XOXO
Mommy

The New York Times Chocolate Chip Cookies

Adapted from Jacques Torres Top of Form
Bottom of Form
Time: 45 minutes (for 1 6-cookie batch), plus at least 24 hours’ chilling
2 cups minus 2 tablespoons
(8 1/2 ounces) cake flour
1 2/3 cups (8 1/2 ounces) bread flour
1 1/4 teaspoons baking soda
1 1/2 teaspoons baking powder
1 1/2 teaspoons coarse salt
2 1/2 sticks (1 1/4 cups) unsalted butter
1 1/4 cups (10 ounces) light brown sugar 
1 cup plus 2 tablespoons (8 ounces) granulated sugar
2 large eggs
2 teaspoons natural vanilla extract
1 1/4 pounds bittersweet chocolate disks or fèves, at least 60 percent cacao content
 Sea salt.
1. Sift flours, baking soda, baking powder and salt into a bowl. Set aside.
2. Using a mixer fitted with paddle attachment, cream butter and sugars together until very light, about 5 minutes. Add eggs, one at a time, mixing well after each addition. Stir in the vanilla. Reduce speed to low, add dry ingredients and mix until just combined, 5 to 10 seconds. Drop chocolate pieces in and incorporate them without breaking them. Press plastic wrap against dough and refrigerate for 24 to 36 hours. Dough may be used in batches, and can be refrigerated for up to 72 hours.
3. When ready to bake, preheat oven to 350 degrees. Line a baking sheet with parchment paper or a nonstick baking mat. Set aside.
4. Scoop 6 3 1/2-ounce mounds of dough (the size of generous golf balls) onto baking sheet, making sure to turn horizontally any chocolate pieces that are poking up; it will make for a more attractive cookie. Sprinkle lightly with sea salt and bake until golden brown but still soft, 18 to 20 minutes.
Transfer sheet to a wire rack for 10 minutes, then slip cookies onto another rack to cool a bit more. Repeat with remaining dough, or reserve dough, refrigerated, for baking remaining batches the next day. Eat warm, with a big napkin.

Eat Local, Buy Local, Grow Local

After clearing off my whiteboard and having some fabulous women tour my humble little studio I was reminded of the WPA initiative inspired prints commissioned by ReadyMade. My favorite of this group was by artist Chris Silas Neal, "Eat Local, Buy Local, Grow Local" which  you can download and print via ReadyMade*. I love the colors, the layers, his beautiful typography. More! More! More!

This topic coincides with my current affection for Michael Pollan-- The Ominvore's Dilemma, In Defense of Food, and his newest publication Food Rules...he writes here on the Huffington Post about eating with common sense.


*download no longer available

Pumpkin Ginger Pancakes

These Pumpkin Ginger Pancakes are THE breakfast hit of our house right now. I've been making them in double batches nearly every weekend for the past two months. I freeze the ones not eaten that day, and pop them in the toaster oven on weekday mornings. Personally I'm a huge fan of the ginger butter (that won't be a surprise to anyone who is already quite familiar with my ginger obsession). The boys can do without it and simply prefer honey or maple syrup. Best served with bacon, and a cup of hot coffee in a vintage boy scout camp mug (see above). Delish. Thanks to Sunset Magazine for the recipe.

Pumpkin Ginger Pancakes

PREP AND COOK TIME: About 45 minutes

MAKES: About 8 pancakes; 2 to 3 servings

1 cup all-purpose flour

2 tablespoons firmly packed brown sugar

1 teaspoon baking powder

1/2 teaspoon baking soda

1/2 teaspoon ground cinnamon

1/2 teaspoon ground ginger

1/4 teaspoon ground nutmeg

1/4 teaspoon salt

1 large egg

3/4 cup milk

3/4 cup canned pumpkin

1/4 cup plain low-fat or nonfat yogurt

2 tablespoons butter, melted

Candied-ginger butter (recipe follows)

Maple syrup

1. In a large bowl, stir together flour, brown sugar, baking powder, baking soda, cinnamon, ginger, nutmeg, and salt. In another bowl, mix egg, milk, pumpkin, yogurt, and butter until well blended. Stir egg mixture into flour mixture just until evenly moistened.

2. Place a nonstick griddle or a 12-inch nonstick frying pan over medium heat (350°); when hot, coat lightly with butter and adjust heat to maintain temperature. Spoon batter in 1/3-cup portions onto griddle and gently spread into 4-inch rounds. Cook until pancakes are browned on the bottom and edges begin to look dry, 2 to 3 minutes; turn with a wide spatula and brown other sides, 2 to 3 minutes longer. As pancakes are cooked, transfer to baking sheets and keep warm in a 200° oven. Serve warm with candied-ginger butter and maple syrup.

Candied-ginger butter. In a bowl, with a wooden spoon, stir 2 tablespoons finely chopped candied ginger into 1/4 cup (1/8 lb.) soft butter (soften in a microwave oven on full power [100%] for 5 to 10 seconds). Chill until firm before serving. Makes about 1/4 cup.

Per pancake: 211 cal., 51% (108 cal.) from fat; 3.9 g protein; 12 g fat (7.2 g sat.); 22 g carbo (1 g fiber); 346 mg sodium; 58 mg chol.

Happiness is...

Happiness is...Coffee, Best Friends, Responsible Ecological Choices, and Great Design

I had the pleasure of spending great BFF time with KT in Minneapolis last weekend. While my original gift idea was to locate a quality version of the old "Best Friends" necklace, with the charm split in two, we found something better. In our shopping excursions we located a sophisticated, yet utilitarian item already on my holiday wish/give list:

I Am Not A Paper Cup James Burgess, 2007 An eco-friendly alternative to disposable cups, this double-walled porcelain version with a pliable silicone lid keeps beverages hot and doesn't burn your hand. Found in a variety of locations--momastore.org, thinkgeek.com--we found these at Paper Source in Uptown Minneapolis. I heart mine.